Glowplug to transom with glow engines. 450 to 470mm. With Zenoah
430 to 450 ( transom is the vertical part of the back of the boat.)
Join hull and deck together with fibreglass paste. The outside
edges of the lip may not align correctly, so try to align the actual
edge of the hull and deck. Cover the lip with fibreglass paste and
clamp the top and bottom together with bulldog clips or spring type
clothes pegs. For racing it is a good idea to put a layer of glass
cloth and resin around the inside of the hull/deck joint and then
the lip can be removed completely. For sport use this is not
necessary. Fit the engine to the complete rubber mount assembly and
position it where shown but do not glue in place yet. Fit the
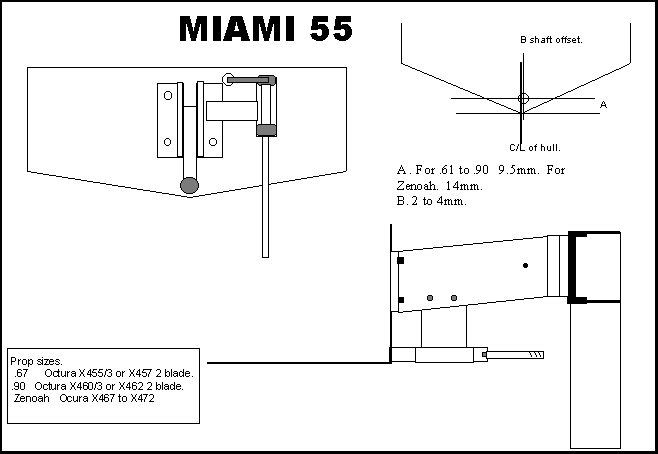
coupling to the motor. Check the drawing above for the position of
the tube through the transom. On .90 and Zenoah engines the
propshaft should be offset to the right by 3 to 4mm as shown on the
drawing. Drill an undersize hole for the proptube in the ‘V’ of
the transom . Enlarge the hole with a round file until the tube just
fits through it. Seal the tube exit through the transom with
silicone tube or silicone sealer. Cut off the lower rudder arm and
fit the strut assembly to the transom using the four M4 screws
provided and reinforce the inside of the transom if required with a
plywood plate or fibreglass mat and resin. Fibreglass the front end
of the tube in position at the same time as fitting the engine mount
making sure that the tube lines up with the engine coupling. Cut the
prop tube to length so that it is about 10 to 12mm from the
coupling. Cut the flexi to length, remembering to leave a gap of 5
to 6mm (not less than 5mm) between thrust washer and the strut. Do
not cut the flexi too short, because it has to go inside the
coupling. The fuel tank can be fitted in front of or behind the
engine. Hold the tank in place with rubber bands through hooks
fitted to 2 strips of 3/8" wood glued to the hull. The engine
can be held temporarily in place with Plasticene whilst the engine
mounting feet are tacked in place with thick cyano (superglue). Cut
down the feet or pack them up as required. The flexi should slide
smoothly into the coupling, to be sure of correct alignment. Fix the
mounting feet in position with fibreglass paste. This can be
reinforced with fibreglass mat or tape if required. The inside of
the deck hatch opening in the deck should be cut back until the
hatch fits into it. Fix the hatch down using GA8 hatch fasteners or
similar at the rear. At the front, glue to rods or a plate onto the
underside of the hatch to locate under the front edge of the hatch
opening. Reduce the width of the the lip of the hull with a hacksaw
and finish off the edge with coarse production paper or a sanding
disc. Fit rubbing strip (GA28) if required to the lip with cyano
glue. When the installation is complete, give the inside of the boat
a coating of Supaglaze(PM41) to fuel proof it. The radio box can be
fibreglassed in place. Only use balanced / sharpened propellers. We
recommend Octura props.
For all engines up to and including .67( 11cc) use 3/16 flexicable
with 3/16 stubshaft.
For .80/90/100engines use 1/4" flexi stepped down to
3/16" shaft. For Zenoahs and other petrol engines use 1/4"
flexi with 1/4" stubshaft.